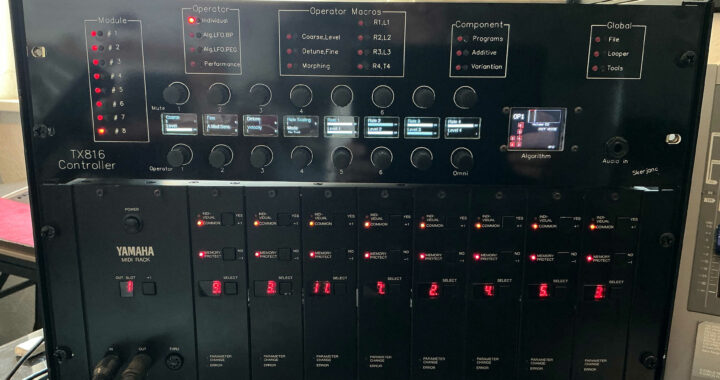
This guide outlines the key features and functions of the TX816 Controller, a powerful interface for managing your Yamaha TX816 FM synthesizer and unlocking advanced component synthesis capabilities.
You can also use the controller to modify the patches on one or multiple DX7 (Mark 1) or TX7. In this case you have to enable SYSEX in a hidden menu of the DX7:
- Function > 8 > MIDI Channel > press 8 > Sys info Unavailable > press Yes for Available .
- Internal memory protect > off.
Also the new Dtronics DT-DX is now fully compatible to the TX816. With the help of the developers we have got all parameters identical to it’s original.
🔌Powering On
Although the device can be powered via the USB connector, this port is primarily intended for future firmware updates. For normal operation, the device should be powered through the rear connector using a suitable power supply (5.5mm, 7–9 V, 1 A, center‑positive), with a mains plug appropriate for the local region. This ensures stable performance when installed in a rack. In addition, the preamplifier for the audio input is only available when using this external power source.
🔌 MIDI Connectivity
The controller sits between your keyboard and the TX816, using the following MIDI ports:
- From KB → Connects to your keyboard
- To TX816 → Sends MIDI to the synthesizer
- From TX816 → enables connection feedback during startup and allows you to load patch banks directly from the TX816. A second cable from the TX816’s MIDI OUT to the controller’s From input.
📁 Patch Management
Patches are organized in a SD disk built into the controller. These patches are served directly from the controller and are not stored permanently in the TX816’s internal memory. To benefit best from the controller, always have it connected to the TX816.
- The library includes:
- 8 folders for individual TF1 modules
- 11 folders for combination patches
- Additional free folders for custom use
- Each folder can hold unlimited patches, giving you full flexibility.
- The disk comes fully loaded with hundreds of patches and multi sounds for orientation, you can delete them all.
⚙️ Initial Configuration
Before use, assign MIDI channels 1–8 to the TF1 modules in ascending order on your TX816 device. This ensures proper communication between the controller and each module.
🎚️ Mixer Panorama Settings
For optimal stereo imaging, use the following panorama values on your mixer:
| Module | Panorama | Alternative Panorama |
|---|---|---|
| #1 | -63 (far left) | -63 |
| #2 | +64 (far right) | +64 |
| #3 | -48 | -63 |
| #4 | +48 | +64 |
| #5 | -32 | -63 |
| #6 | +32 | +64 |
| #7 | -16 | -63 |
| #8 | +16 | +64 |
💡 Tip: When using component synthesis across multiple modules, choose an even number of modules and apply these panorama settings for a balanced stereo field.
💡First Steps: After you connected the controller properly with your TX816, keyboard and the mixer, try following steps:
- Press Omni button (the lower right encoder)
- Choose File > Select File > 12: 8-aaaaaa000
- Press Load Multi
- hold some keys…
🖥️ Controller Interface
- The controller features 16 encoders with displays, organized across multiple pages.
- Use the small buttons to switch pages.
- A lit LED next to a button indicates the active page.
- Dimly glowing LEDs signal that settings on that page are active in the background (e.g., a running looper).
🎛️ TF1 Module Selection
To edit a module:
- Press one of the eight buttons on the left side.
- The corresponding LED lights up, indicating the active module.
- Begin adjusting parameters using the encoders.
🌐 Omni Mode
Omni Mode allows all modules to receive MIDI messages simultaneously and is essential for the multi-program and components synthesis. In Omni Mode, all modules respond to the same MIDI notes and sound parameters. When the sub-mode OMNIedit is single, all modules are playing as well, but only the active module responds to edits.
To activate:
- Select the last module you want included (e.g., module 8 to include all).
- Press the Omni button (see label below the lower rightmost encoder).
Indicators:
- All active module # LEDs glow halfway.
- Display background turns green or red/(some devices blue) depending on the OMNIedit mode (see below).
In the Tools Page, the parameter OmniMode defines how changes on parameter sound affects defines all modules or the selected single module.
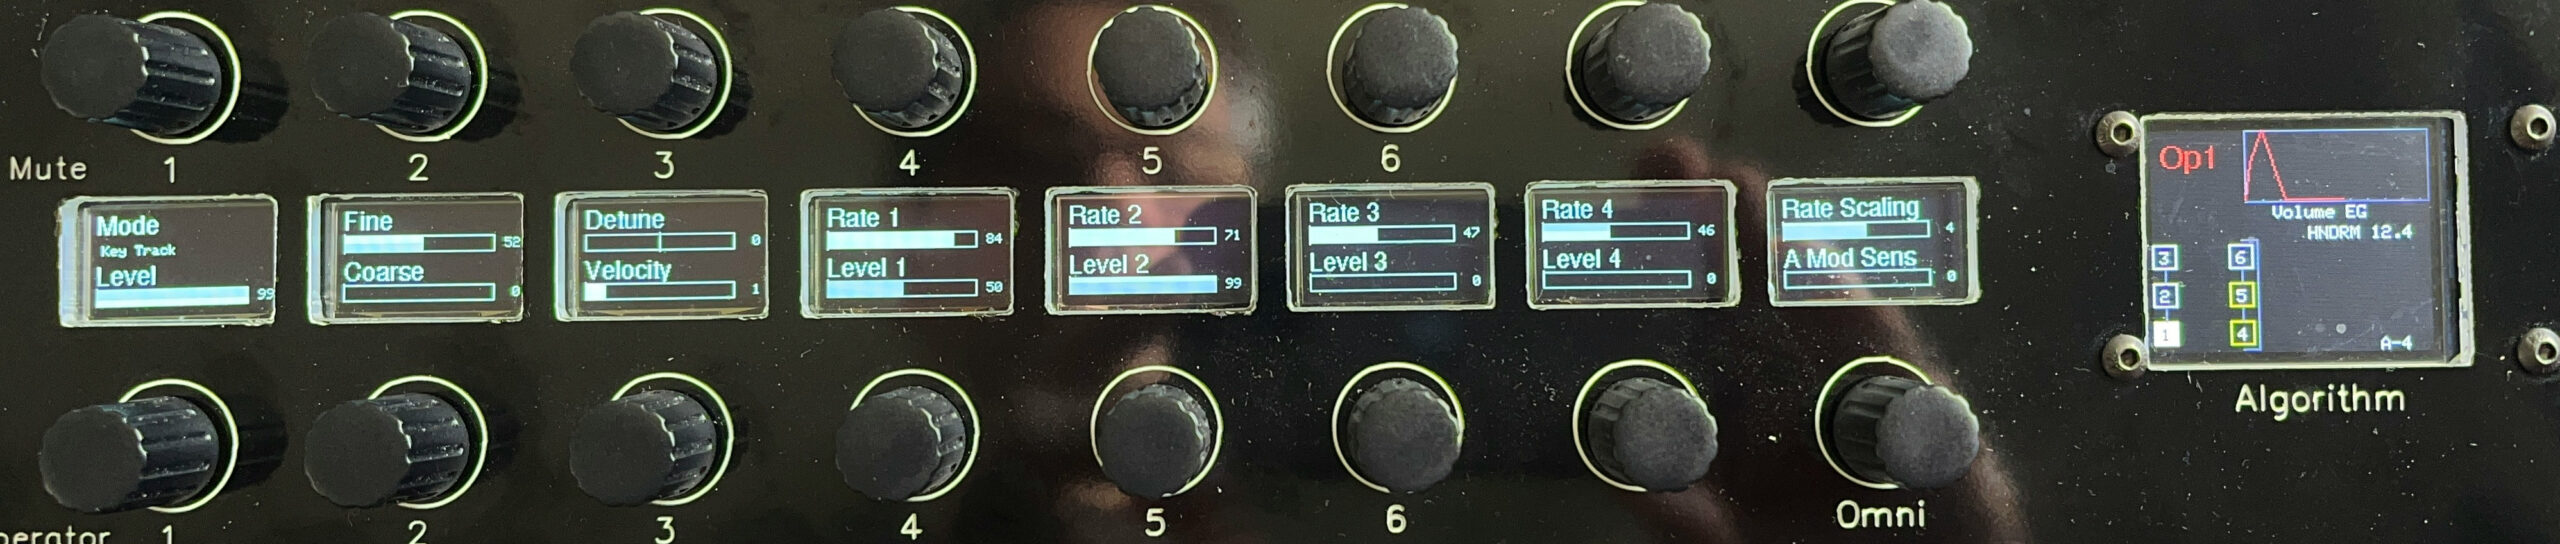
🔧 Operator Editing
These pages let you edit all FM synthesis parameters like volume, frequency, and envelope settings.
- The bottom six buttons select the operator to edit.
- The top six buttons mute individual operators.
- The TFT display shows the algorithm structure:
- Current operator: filled block
- Muted operators: red blocks
- Fixed-frequency operators: yellow blocks
Individual Page
Adjust all FM parameters for the selected operator, including level and rate settings.
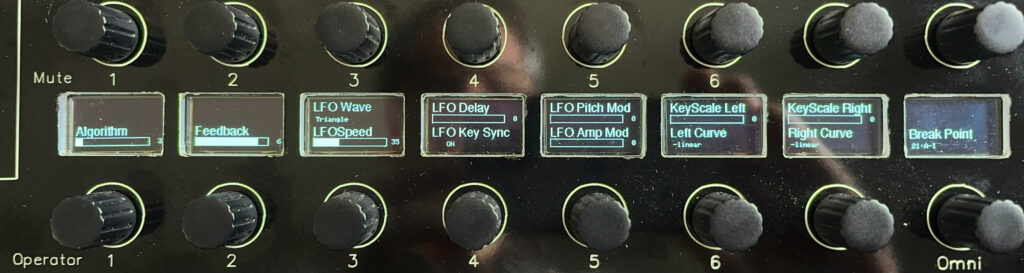
Algorithm Page
This page is for all parameters related to the algorithm, feedback, LFO, and loudness Break Point.The Break Point parameter expects a key number that defines where the left and right curves begin. You can enter the key number manually using the dial or by pressing the corresponding key on your keyboard. Turn the dial slightly to ensure the keyboard input is focused on this parameter.
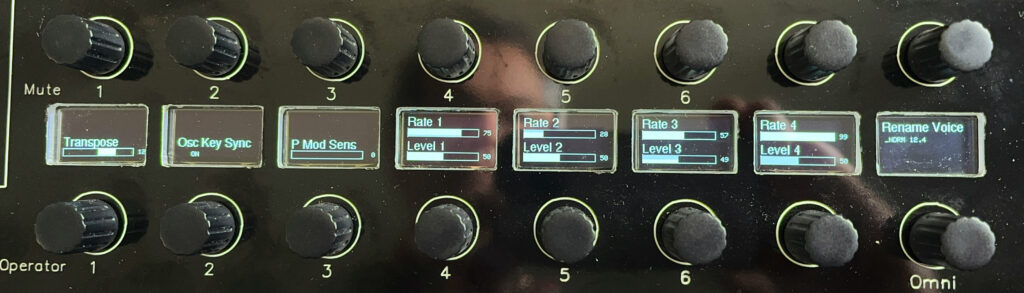
Pitch Page
This includes settings for transpose, pitch envelope, and more. You can rename a patch internally by pressing Rename Voice.
🔄 Rename Voice
Each DX7 patch includes its name, which is not visible on the TX816, but helps to organise multi-patch programs. This name will be used for the File>Save operation as well. To edit the name:
- Turn the encoder to select the position of a character to edit
- Press the encoder to enter characte edit mode
- Turn the encoder to select the character.
- Press then encoder to finish.
⚙️Performance Page
This page contains parameters for external controls, master tuning, and portamento.
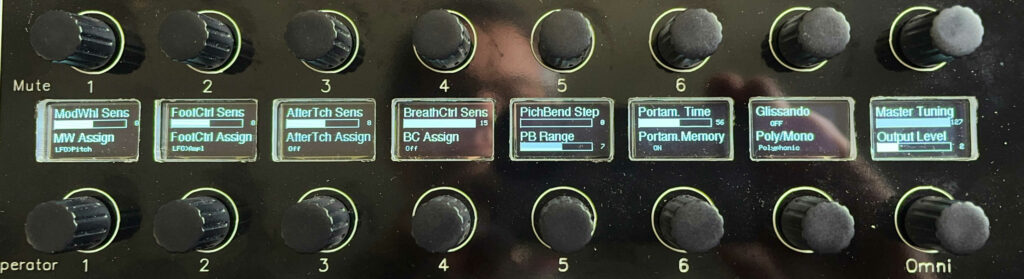
That’s it, you can now edit all native parameters of your synth. Do you want more? Read on!
⚙️ Operator Macros
These pages allow for intuitive, simultaneous editing of a single parameter across all six operators — all on one screen.
🔄 Parameter Selection
Use the LED knob to select one of the following parameter pairs:
- Coarse / Level
- Upper encoders: Adjust coarse frequency per operator
- Lower encoders: Set individual operator levels
- Detune / Fine
- R1 / L1
- R2 / L2
- R3 / L3
- R4 / L4
🎛️ Macro Controls
Additionally each macro page includes the same three powerful macro knobs. First Turn the first parameter dial a bit to focus on this as the origin of the macros mechanism.
- Increment
Applies a stepped change across operators.- Example: If focussed Operator Level starts at value 20 and Increment is set to 1, values of all operators will be 20, 21, 22, etc.
- Negative values are supported for descending sequences.
- You can focus on any operator number, to leave some untouched. The lower 4 operators will propagate to the right, the higher 4 operators to the left.
- Shift
Uniformly adjusts all operator values by the same amount up or down. - Variance
Introduces randomized variation.- A variance of 5 will randomly adjust each value between –5 and +5.
- A new random sequence is generated each time the knob is turned.
🧪 Tip: Want to reverse the order of changes?
Set the origin to Operator 6, then turn the Increment knob. Then operator 5 is incremented 1 more than Operator 6, Op 4 even more etc. You can also define the starting point by selecting any operator’s encoder.
Encoders for OP1–4 apply changes upward, while OP5–8 apply them in reverse.
🔁 Morphing
This page enables dynamic morphing between two patches, i.e. all (or selected parameters) are interpolated between these patches while you turn your modulation wheel.
- The patch loaded in the current active module acts as the First Source. The Second Source is the module selected with the Second Source dial (by default, this is Module 2).
- Morphing is controlled live via:
- The Morph Amount knob
- Or a freely assignable MIDI controller (set via Morph CC Number)
To prevent MIDI overload:
- Morphing is triggered only when the controller knob comes to rest.
- The more parameters are set active, the more SYSEX data must be transmitted. You can optimize performance by selecting from eleven specific parameter groups for morphing (e.g., frequencies, L1, R2, algorithms, etc.).
💡 Tip: The selected Morph CC is not passed through to the TX816. If you assign Morph to ModWheel (CC 01), the synthesizer will not react to it. Choose a different CC number for morphing in this case.
morf2Modules — What it does
The morf2Modules button generates a series of intermediate, morphed patches between the active module and the Second Source module. These morphed versions are written into all 8 modules, with the Morph CC position determining how far the morph progresses by the time it reaches Module 8.
💡 Tip: Practical workflow for using morf2Modules
- Load a patch into Module 1.
- Set Second Source = 2, then load a different patch into Module 2.
- Enable the parameter groups you want to morph (e.g., Coarses, Levels).
- Assign the ModWheel as your Morph CC (Morph CC# = 1).
- Move the ModWheel and listen to the morphed sound.
- Stop the wheel at the position that should define the final sound for Module 8.
- Press the morf2Modules button twice to confirm.
- Now Modules 1–8 contain a progression of variations between the two patches.
- These can be used for Oberheim mode, OMNI Variations, or any other feature that benefits from multiple patch variants.
🧩 Components
These pages are a unique feature of the TX816 Controller.
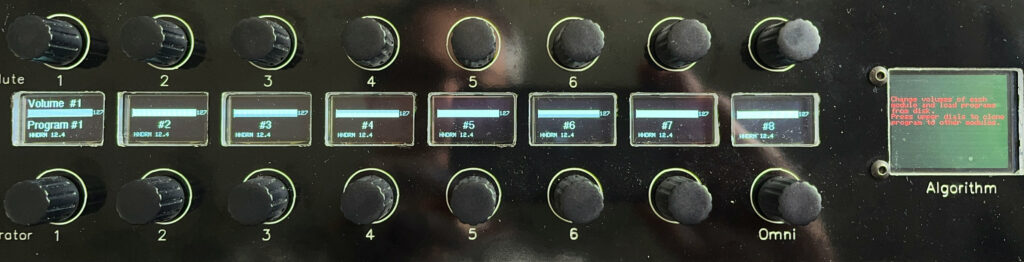
🧱 Programs – Multi-Module Composition View
This view provides a full overview of all eight TX816 modules, designed for manual composition of complex multi-programs (Component Synthesis). It’s ideal for crafting layered sounds by assigning distinct roles and patches to each module.
🗂️ Planning Your Patch Layout
Before composing:
- Decide the function of each module (e.g., transients, noises, different spectrum contents, static sounds etc).
- Place appropriate patches into directories 101–108, each corresponding to a specific module number.
🔻 Top Row Encoders: Patch Loading
- Each module has a dedicated patch loader.
- Load sounds directly from the corresponding directory 101-108 into the selected module.
🎚️ Low Row Encoders: Volume Control
- The row of knobs above the patch loaders controls each module’s volume via MIDI CC.
- Allows for dynamic balancing of your multi-program.
- If some of the volumes are below 10, the Programs LED will glow dark to remind you that a module is muted.
🔁 Top Row Push Buttons: Patch Cloning
.Sometimes you want clone a patch to all other modules to modify them slightly per module (or heavily on the Variation Page).
- Select the push button in the top row to clone a patch from one module to all others.
- The button number corresponds to the source module.
- Example: Pressing button 3 copies Module 3’s patch to Modules 1–8.
🎛️ This layout is perfect for experimenting with layered textures, stereo spreads, or building additive structures across modules.
🔊 Additive Synthesis
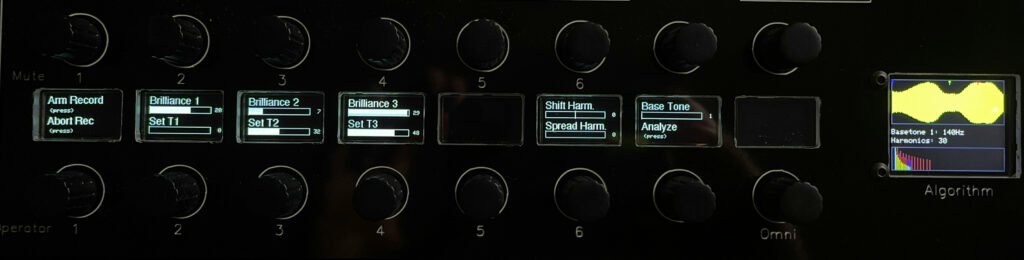
This page enables you to resynthesize a sample using additive techniques. The process involves analyzing incoming audio signals and distributing harmonic content across the TX816’s operators.
🎙️ Recording a Sample
- Connect your sample source to the Audio-In jack. Your line signal should have 200mV or more.
- Possibly load a simple patch to all modules in OMNI mode (like directory 109>6 INITRS)
- Arm Record:
- First press: Activates VU meter on the TFT display to monitor input levels. Adjust the volume with the volume knob above the Audio jack.
- Second press: Begins recording once the input exceeds a threshold.
- The waveform is displayed after the recording.
- Abort Recording:
- Stops the recording process while it is waiting for an incoming signal.
- Generates a rectangle test waveform for test purposes. You can start with this waveform for first experiments.
💡 Tip: When recording a sample, the power connector at the back side must be connected. The audio preamplifier/limiter is not powered by the USB jack.
💡 Tip: At some environments the input may catch hum noise. Use a balanced cable or a simple audio isolation transformer (DI box), this will solve it. The balanced signal is taken from Tip/Ring of a TRS plug. Mass is ignored.
⏱️ Time Reference Points
- Use T1, T2, T3 as three temporal markers for resynthesis. These points define where harmonic analysis is focused. These markers are shown as red, green and blue marker triangles above the waveform display.
- Brilliance 1–3:
Boosts or cancels high-frequency content at each time point, enhancing clarity and brightness.
🎼 Harmonic Controls
- Shift Harmonics:
Adjusts the coarse frequency offset of each of the 32 operators by a set amount.- Press Analyse to hear the impact.
- Spread Harmonics:
Detunes all operators slightly to create a metallic or shimmering effect. - Base Tone:
The base tone is determined at the analysis calculations. Assigns T1, T2, or T3 as the reference pitch for harmonic mapping.- If the recording contains multiple pitches, results may vary significantly.
- Press Analyse to hear the impact.
📊 Analyse Function
- Pressing Analyse triggers a Fast Fourier Transform on the recorded sample.
- Below the waveform display you will see the corresponding spectrogram with the volumes of each harmonic. Often the lines are not white, but colored in red/green/blue. This indicates differences of the spectra at the three Time Reference Points T1, T2, T3.
- The first 30 harmonics are assigned to the operators of the first five TF1 modules. The display also shows the number of harmonics found and assigned to the operators.
- Algorithm #32 is selected automatically to allow all operators to sound simultaneously.
- Envelope generators of all operators are configured based on the harmonic structure.
🎧 After analysis, up to 30 operators are active, and the patch reflects the spectral content of your sample. More overtones are not supported, because of the limit of the operator’s coarse tuning scale.
🎧 Use this feature experimentally, play with brilliances 1-3 or sample sound while playing scales. Remember, this is not a true audio resynthesis with realistic reproduction of the audio, because the operators cannot deal with phase information. In future firmware versions, I will try to calibrate the amplitudes better to approach the original sound.
🎨 Variation Page
Imagine:
- Each operator’s parameters as one dimension
- All six operators as a second dimension
- Component Synthesis introduces a third dimension, allowing you to sculpt sound in a multi-layered way by running variations of one patch between several TF1 modules.
🎨 This approach opens up new creative possibilities for FM synthesis — blending structure, modulation, and timbre across operators like never before. The Variation Page lets you generate expressive, multi-dimensional variations of the current program in Module #1 by incrementally adjusting parameters across all active modules. These incremental variations among modules can be: all kind of tunings, envelope, LFO settings, modulation strength, velocity and algorithm numbers.
🧠 Getting Started
- Decide how many modules you want to include in the component synthesis.
- Use the LED buttons in the Modules section to set the number of the last module to be activated.
- Specify the base patch that will serve as the seed.
- Press OMNI; the LEDs of the selected modules will dimly light to show they are active.
- Go to Component > Programs and press the top encoder for the module number of the base patch. This copies the base patch to all other active modules.
- Start making variations between the modules.
- You can also assign different patches to each module if you prefer to run varied sounds simultaneously.
🔧 Parameter Controls
Each encoder on this page modifies a specific parameter across all active modules. Here’s what each one does:
- Detune
Applies incremental detuning across modules.- Example: A value of 30 detunes modules within a range of –30 to +30.
- Variance (Detune)
Applies a random detune value per module within the selected range.- Each encoder tick generates a new random series of the given variance.
- Carrier Frequency
Increments the coarse frequency of Carrier operators only, based on module number.- Module 1 remains unchanged; higher-numbered modules receive greater changes.
- Variance introduces random frequency shifts per module.
- Modulator Frequency
Similar to below, but applies to Modulator operators only.- Variance behaves identically.
- Attack (T1 Time)
Creates a linear fade-in effect across modules.- Modules fade in sequentially.
- L3 of Carrier operators is automatically set to 0 for fade-out.
- Negative values reverse the fade direction.
- Example: A value of 30 spreads 8 modules sequencially over ~4 seconds.
- Decay (T2 & T3 Times)
Applies exponential changes to decay times.- Positive values lengthen decay; negative values shorten it.
- Effect depends on L2 and L3 levels — adjust these on the Operator > Individual page if needed.
- LFO Speed / Pitch / Amp
Gradually increases LFO parameters across modules.- Creates vivid modulations and pulsations.
- Ensure operators respond to LFO by adjusting A Mod Sens in OMNI mode via the Operator > Individual page.
- Velocity Sensitivity
Gradually increases operator’s velocity sensitivity from the first to the last module . - Brightness
Adjusts modulator volumes across modules.- Higher-numbered modules receive stronger changes.
- Carrier volumes remain unaffected.
- Total Brightness
Uniformly adjusts modulator volumes across all modules. - Algorithm Rnd
Assigns a random algorithm number to each module.
✅ Finalizing Your Variation
- Finish (Fix)
Press the encoder to finalize your variation.- All encoder values reset to 0.
- Automatically jumps to the File Page, where you can save the new multi-program.
- Undo
Select Undo before pressing the encoder to cancel all edits.- All modules revert to their original state prior to entering the Variation Page.
🎛️ File Management
All sound data is stored on an internal 2GB SD card, organized into numbered subdirectories with the following structure:
| Directory | Purpose |
|---|---|
| 90-100 | Contains all Multi-Programs — collections of patches from multiple modules saved under a single name. When editing the name of a new program, the controller automatically suggests the number of modules involved as the first character of the name. |
| 101–108 | Dedicated libraries for individual modules 1 through 8. |
| 109–150 | Free patch libraries available for general use. |
📂 Loading a Program (Patch)
To load a single patch:
- Ensure OMNI Mode is turned off.
- Select the desired module number.
- Upon entering the File page, the corresponding directory for the selected module is automatically chosen.
- To change directories, press the Select Directory knob.
- The TFT screen displays a numbered list of patches in the selected directory, sorted alphabetically.
- Turn the Select and Load Patch knob to choose a patch — it will be loaded instantly without needing to press.
🧩 Loading a Multi-Program
Multi-Programs are sets of patches assigned across multiple modules.
- To load sounds to multiple modules simultaneously, select directory 90-100 while in OMNI Mode (if not done automatically).
- Directory 100 contains my ‘factory’ multis.
- Turn the Select and Load Patch knob to browse available Multi-Programs.
- Press Select and Load Patch knob.
Note: Due to their larger size, Multi-Programs require pressing the Load button to initiate transfer.
You can also combine Multi-Programs:
- For example, if you want to keep the patches of modules 1–4, set Load Destination to 5 (default is 1), then press Load, which loads the first 4 patches of the selected Multi-Program into modules 5-8.
- This assigns patches across all 8 modules.
🛠️ Additional File Operations
These functions are available on the same page:
- Rename: Change the file name. For Multi-Programs, a leading number is automatically added to indicate the number of modules used.
- Save: Save the current patch to the selected directory.
- If OmniMode is active, patches of all involved modules are stored in a Multi-file in the directories 90-100.
- If OmniMode is not active, only one patch is stored in directories 101-150
- Delete File: Remove the currently selected patch.
- Move To: Transfer the selected patch to another directory. Use this knob to select the target directory, then press to confirm.
- Load Bank: requests the TX816 to send all 32 patches of the current module. Before this, you have to select the module number on the TX816 manually (“Out Slot”) to send its module through the common MIDI out port. All patches are stored into the currently selected directory. This also works for any compressed DX7 Mark1 SYSEX dump (32 patches) from your computer.
- Purge Directory: Delete all contents of the selected directory — useful when importing a full patch sent from the TX816 or computer. When activated, a security prompt appears under the button “Are you sure?” then press again.
🔁 Looper Page
This section features a simple yet effective MIDI looper that listens to the MIDI IN port and records your live performance. You can let the loop run in the background while simultaneously editing voices, perfect for hands-on sound design. The looper supports up to 8 polyphonic voices, the timing is not being quantized.
🎹 Controls & Functions
- Erase: Clears the current recording from memory.
- Record: Arms the looper and waits for you to begin playing. The loop duration is defined from the moment you play the first note until you press Stop.
- Play: Starts playback of the recorded sequence. While playing, you can press Record again to overdub additional notes.
- Stop: Halts both recording and playback.
- Tempo × 10%: Adjusts the playback speed by ±50%, allowing you to slow down or speed up the loop as needed.
🧰 Tools Page
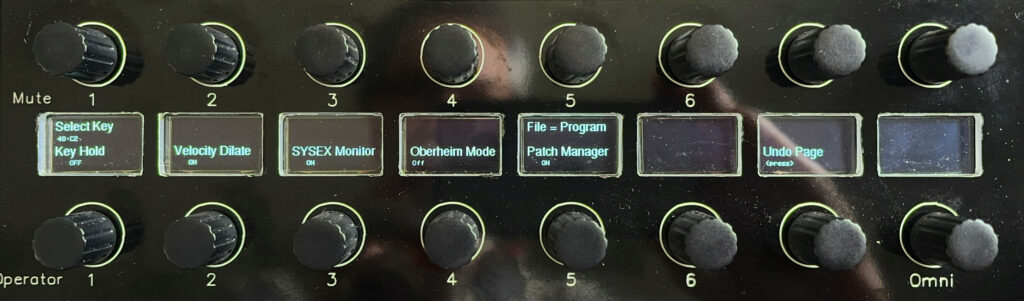
This section offers a suite of utility functions designed to enhance your workflow and provide deeper control over your TX816 setup.
🎹 Key Playback
- Use Select Key to define the MID note. Once focused with this knob, you can also set the note by your MIDI keyboard.
- turn Key Hold to trigger a tone manually.
- Ideal for creating drone tones or testing patches without a connected keyboard.
🎯 Velocity Compress
- The first DX7 generation supports velocity values from 0–99, while modern keyboards output up to 127.
- When Velocity Compress is enabled, incoming velocity values are scaled down to match the DX7’s range.
- Ensures consistent dynamics across vintage and modern gear.
🧪 Sysex Monitor
- A diagnostic tool for monitoring MIDI SysEx data via the USB port.
- Useful for debugging communication issues or verifying MIDI messages during patch transfers.
🧪 OmniEdit
OmniEdit defines how parameter changes are applied when OMNI mode is active. It controls whether your edits affect one module or the entire system. In OMNI mode each
Modes
- all: Changes to FM‑operator parameters are sent to all active modules simultaneously. This is useful when you want to adjust several modules at once; for example, when creating a uniform sound across multiple units. The display background is dark red (or blue) to indicate this mode.
- single: Only the currently active module receives the parameter change. Choose this mode when you want to fine‑tune one module without altering the others. The display background is dark red, to indicate this mode.
🧱 MIDI Start Ch
Normally you will use MIDI channels 1-8 for the 8 modules of the TX816. In the case you need these channels for your other equipment, you can configure your TX816 module to listen e.g. to channels 9-16. In that case you have to enter 9 here.
🧱 Oberheim Mode
These modes were inspired by the Oberheim Eight Voice synthesizer, where individual note events were assigned to successive voice modules. Building on that concept, this is the Oberheim Rotation Mode; three new modes have been introduced: Static Mode, Random Mode and MPE.
– Rotation Mode
- Each incoming new note is assigned to a different module, creating dynamic and evolving sequences.
- To activate:
- Select Rotation
- Turn off Omni Mode
- Select the last active module (e.g., Module 8)
- MIDI notes will now rotate through the modules in sequence.
- Oberheim Mode operates on a per-note basis: each MIDI note-on triggers a fresh module selection. Legato playing and overlapping notes will still be assigned independently, so expect slightly different timbres for repeated notes even when played in the same register.
– Static Mode
- Assigns notes of a chord to specific modules:
- First note → Module 1
- Second note → Module 2
- And so on…
- Enables polyphonic voice allocation across modules for expressive playing styles.
- Practice, practice, practice.
– Random Mode
- Each new note is assigned to a random module number.
- Oberheim Random Mode is ideal when you want your TX816 to sound less mechanical and more like a living ensemble. It shines in ambient, cinematic, and vintage synth contexts where slight unpredictability enhances musicality.
Practical tips
- Assign the same base patch to all modules and slightly modify them with Component > Variations to have small sound variations across the modules.
- Use for pads and evolving textures — Random assignment adds movement and prevents static, machine-like layering.
- Combine with slow LFOs and detune — different small detune and slow modulation on each modules amplify the organic effect.
- Polyphony considerations — on dense chords the random distribution can create uneven voice usage; reduce chord size or increase release time for smoother tails.
– MPE Mode (currently disabled)
The controller can convert the TX816 to understand the MPE standard. In MPE mode, each module is assigned its own MIDI channel, creating an eight‑voice MPE‑capable FM synthesizer. This allows you to control the instrument directly from MPE controllers such as the Osmose.
- The X‑axis controls Pitch Bend
- The Y‑axis controls the Channel Aftertouch
- The Z‑axis is mapped to Modulation Wheel
Assign the Mod Wheel (CC 1) and Channel Aftertouch to the desired parameters on the Performance Page of module #1 before you activate MPE.
Important
When MPE is activated, the following settings are automatically overwritten in all patches:
- Pitch Bend Range is set to 12 semitones
- Each module is forced into Mono Mode (see Performance Page)
- Mod Wheel and Aftertouch assignments are copied from module #1 to each other modules.
📁 File Manager
- Always keep File Manager set to ON.
- Ensures proper patch handling and access to disk-based libraries.
⏪ Undo Page
- Made a mistake while editing parameters?
- Go from the current edit page directly to Tools > Undo to revert to the previous state.
- A safety net for sound design experimentation.
🚨 MIDI Panic
- If you encounter hanging notes (e.g., switching modules mid-keystroke), use MIDI Panic.
- Instantly mutes all notes across all modules.
🎯 LED Brightness
- The new white LEDs are very bright, you can reduce it on a scale between 1-10.
🛠️ Backup the internal disk to your computer
- Download the file backup.py from my homepage here. Connect the controller to the PC via USB cable.
- Install python on your PC using the Microsoft Appstore.
- Start DOS Command terminal.
- Install python’s serial library from there entering on the command line : pip install pyserial
- Change the path to the directory, where the file backup.py resides. Also, here will be the sub directory “TX816Backup” for the backup files.
- Start script with: python backup.python and respond to the following prompts.
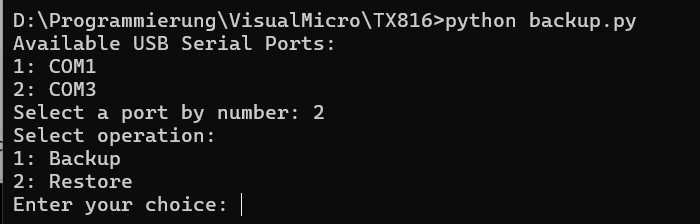
- Select the COM port where the controller is assigned to
- When you select Backup, the controller reboots and sends the whole content of the internal disk, this is is stored in the directory “TX816Backup”
- When you select Restore, be sure that your backup data is in the directory “TX816Backup”
🛠️ Update Your Firmware
Two different TFT display types are used in my builds (“blacktab” and “greentab”), and each requires a slightly different firmware version. If you’ve updated your firmware and notice pixel artifacts along the edges, try installing the other version.
Download the latest firmware here: Blacktab, Greentab
Instructions for the update process can be found here: Update Guide
Is there newly implemented / assignable MIDI CC # with the expnder? I see there’s Morph MIDI CC which is awesome!
Yes, you can define your own Morph MIDI CC. The controller will react on this CC and sends the morphed patch parameters to the TX816 expander in real time.
Awesome. Any other new midi cc # implemented with the tx816 other than morph?
mpe added? i’m blown away! can’t wait to try that (: You’ve put a lot of work into this and it’s brilliant
… MPE timing issues are more complicated than expected. I need more time to find a solution, and your device has now more prority.
How much does it cost to get one?