The following chapters describe the functionality of each editor group and the single pages per button. It does not explain the synthesis engine of the VL1. This text will grow, whenever I have time for it.
🔌 Connect to Power
Before using the VL1 Controller, it’s essential to connect it to a suitable power source. This section outlines your options and precautions.
⚡ DC Power Supply
- Connect the controller via the rear power connector.
- A power supply is not included due to regional compatibility differences.
- Use a DC 7–9V power supply with a 5.5mm plug, center-positive configuration.
✅ Recommended Power Supplies
- Security-01 DC 9V 0.5A 500mA Netzteiladapter
Stecker 5,5 mm x 2,1 mm, Mittig Positiv
Available on Amazon.de - Riot DC Power 9 Volt
Available at Musikhaus Thomann
These models are ideal if you plan to mount the controller into a rack.
🔌 USB Power Option
Alternatively, you can power the controller via Micro USB through the small hole at the top.
⚠️ Important Safety Instructions:
- Insert the cable in the correct orientation:
- Match the white dots painted on later devices.
- Do not insert the Micro USB upside down—this can brick the device.
- The plug should snap in with a soft ‘click’. If it doesn’t, something went wrong—disconnect and inspect before retrying.

The USB cable will also be used to upgrade the firmware via a PC or Mac.
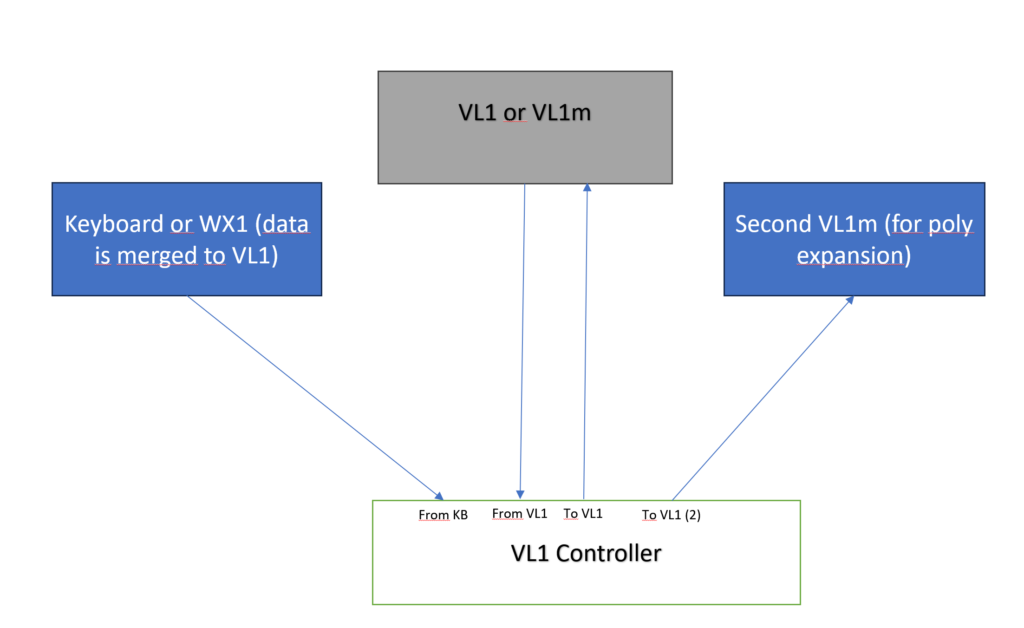
🎛️ Connecting Your VL1 Setup
Set the MIDI channel and Device nr. to 1 on the synth. Depending on your configuration, there are several ways to connect your VL1 or VL1m to the controller. Below are the most common scenarios:
🔌 Scenario 1: Connecting a VL1 to the Controller
- Use 2 MIDI cables:
- VL1 MIDI Out → Controller FromVL1
- Controller ToVL1 → VL1 MIDI In
- Set MIDI Local to ON on the VL1
🎹 Scenario 2: Connecting a VL1m with an External Keyboard
- Use 2 MIDI cables:
- VL1m MIDI Out → Controller FromVL1
- Controller ToVL1 → VL1m MIDI In
- Connect a third MIDI cable between Keyboard MIDI Out → Controller FromKB
🔄 Scenario 3: Connecting Both a VL1 and a VL1m
- Use 2 MIDI cables for the VL1:
- VL1 MIDI Out → Controller FromVL1
- Controller ToVL1 → VL1 MIDI In
- Use an additional cable:
- Controller ToVL1(2) → VL1m MIDI In
- The VL1m will take over the voices 3+4 if you set Utility>Poly Expansion to ON, which is needed for every patch. All config settings are adjusted automatically on both VL1s then.
🧠 General Tips for Using the VL1 Controller
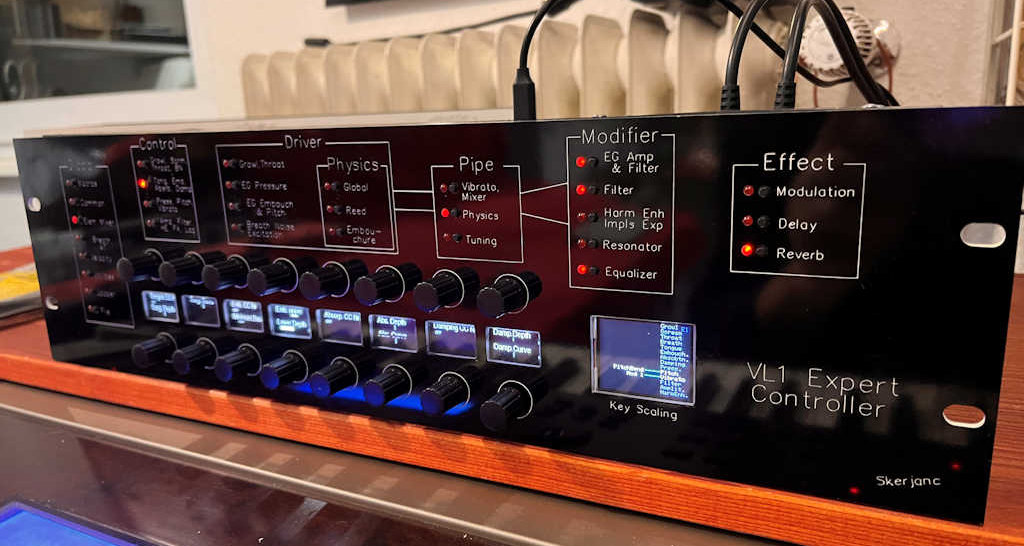
Mastering the VL1 interface begins with understanding its intuitive layout and visual feedback system. Here’s how to navigate it effectively:
🔘 Selecting Function Blocks
- Press the button next to each title to activate the corresponding function block.
- An LED light indicates the currently selected page.
- Multiple LEDs may glow dimly to highlight active pages—such as when a reverb effect or resonator is engaged.
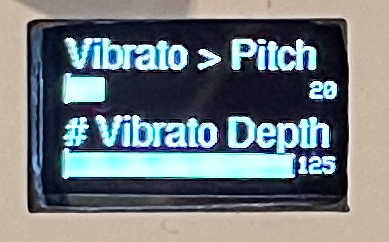
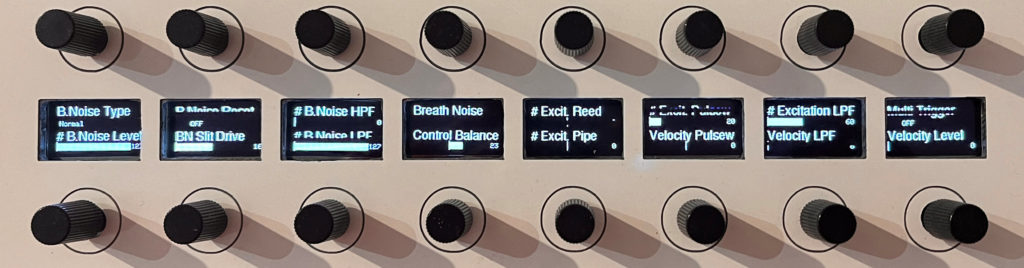
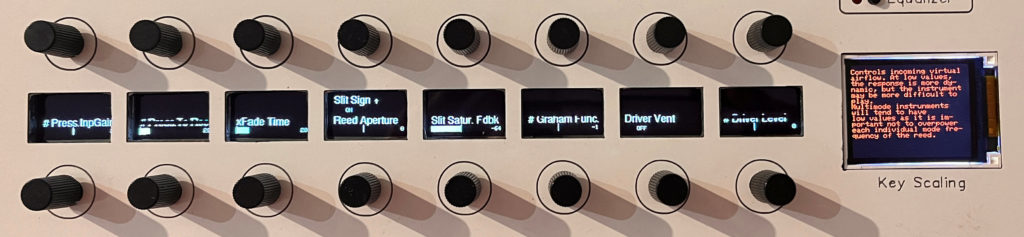
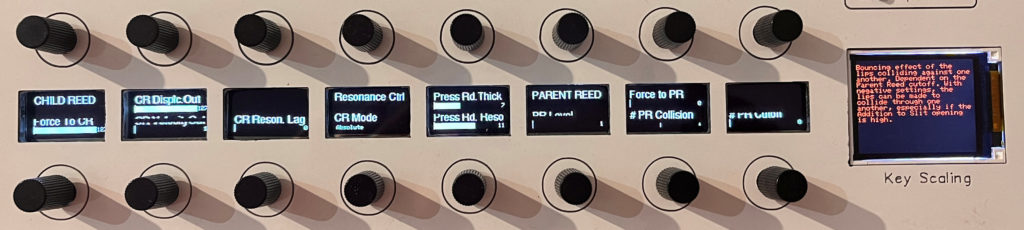
🖥️ OLED Display & Encoder Interaction
- Each compact OLED screen shows the names of parameters linked to the encoders.
- The top half of the screen corresponds to the top encoder.
- The bottom half corresponds to the bottom encoder.
- Use the grid-based endless encoders to adjust values:
- Changes are shown as both a bar graph and a numerical value.
- The rate of change is exponential, depending on how quickly the encoder is turned.
🎼 Key-Based Parameters
- Some parameters involve key numbers or key names.
- You can use the VL1 keyboard or an external MIDI keyboard to select the key.
- First, turn the encoder to focus key detection on that parameter.
🔣 Key Scaling Mode
- Parameters with a trailing dash ‘#’ support key scaling.
- Press the encoder to enter key scaling mode.
- In this mode:
- The lower row of encoders selects the key number.
- The upper row adjusts the offset value.
- If the parameter supports more than 8 breakpoints:
- Pressing a lower button switches to the next page.
- The color screen will display:
“Breakpoints 9–16 (of 16)”
🌙 OLED Sleep Mode
- The OLED display will dim and enter sleep mode after a period of inactivity to conserve power.

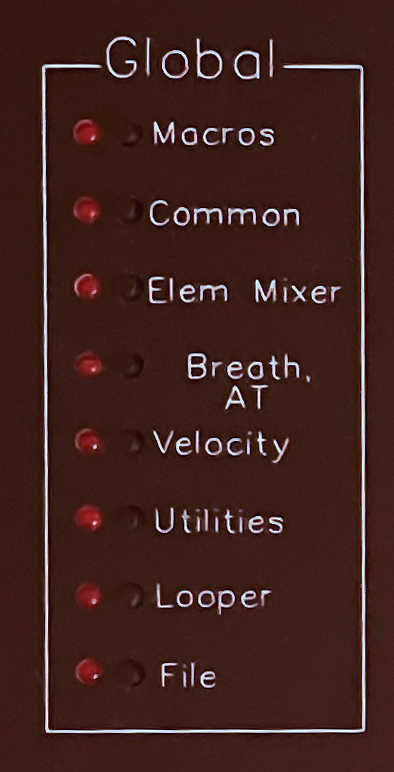
🌐 Pages of the Global Block
The Global mode provides a centralized overview of the current patch via the color display. This section covers patch handling, morphing capabilities, and global settings.

🖥️ Patch Overview
- Upon power-on, the current patch is automatically loaded from the VL1 and displayed.
- If the VL1 is off or the MIDI connection fails, the display will show:
- The firmware version
- A warning about a failed SYSEX response
- When switching to a new program on the VL1, the controller detects the change and requests the updated patch.
🔄 Macros & Morphing
The controller supports morphing between two elements, E1 and E2, allowing smooth transitions between instrument models.
- Morphing is achieved by:
- Turning the “Morph E1<>E2” encoder
- Sending CC control data from your keyboard
- Select the control number using “Morph CC Nr”
- Load E1 and E2 separately via: File > Load E1→E2 only
⚠️ Due to the large number of VL1 parameters, SYSEX transmission may overload the MIDI interface. To prevent this:
- Data transmission is paused while the CC controller is active
- Transmission resumes once the controller stops moving
You can also limit morphing to specific blocks:
- Modifier
- Physics
- Pipe Driver
🧪 Experimental Feature: E2 Page Copy Mode
E2=E1 Mode enables a streamlined workflow by automatically synchronizing Element 2 (E2) with Element 1 (E1). on a per-page basis.
🧠 How It Works:
- When this mode is active, the current state of E1 is copied to E2 each time you switch to a new parameter page.
- Press any page knob in the Driver, Physics, Pipe, or Modifier groups. This triggers a parameter transfer from E1 to E2
- This allows you to temporarily limit morphing to the changes made on E1, simplifying experimentation and sound design.
- If the result isn’t satisfactory, revert using: Utility > Undo
✅ Always deactivate morph features after completing the morphing process to ensure stable operation.
⚙️ Common Settings
This section includes global parameters such as:
- Key mode
- Portamento
- Microtuning
- Voice and element naming
To rename:
- Press again to confirm and move to the next character
- Rotate the encoder to select a letter position
- Press the button to choose a character
Element Mixer
Breath, AT

Velocity
Same as above for parameters controlled by velocity.
🛠️ Utilities Page
The Utilities page offers essential tools for patch management, editing workflow, and expanding your VL1 setup. Here’s how to make the most of it:

🎹 Key Hold Function
- Assign a note for continuous playback while adjusting sound parameters on other pages.
- Select the desired note and toggle Key Hold as needed—ideal for real-time sound shaping.
🎛️ Device & Element Selection
- Set the device number that the VL1 responds to.
- Choose between Element 1 (E1) or Element 2 (E2) for editing.
- The active element is shown as a red E1 or E2 in the top-right corner of the TFT display.
↩️ Undo & Help Texts
- When entering a parameter page, the previous state is saved.
- Use the Undo function to restore it if needed.
- Enable or disable Help Texts for physical model pages via the encoder above.
🎶 Polyphonic Expansion with a second VL1m
Expand your setup for 4-voice polyphony and dual-device editing:
- Connect the 4th MIDI Out labeled ‘To VL1(2)’ to your VL1m.
- Go to the Utilities page and activate ‘Poly Expansion’.
- Wait a few seconds—all configurations are auto-adjusted, and the modified voice is sent to the second device.
- When switching programs on the primary VL1, the patch is automatically mirrored to the second VL1.
🔁 Important: Reactivate ‘Poly Expansion’ after loading a new voice, as this setting is stored per patch.
This setup utilizes all four MIDI connections, enabling seamless control across devices.
🔁 Looper
The Looper page offers a simple yet powerful polyphonic MIDI looper, ideal for capturing and refining your performance.
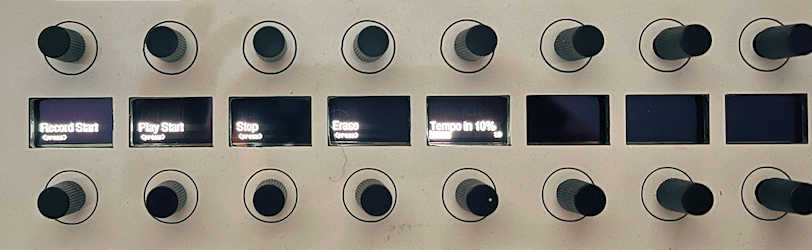
🎼 Recording & Playback
- Record MIDI events such as:
- Notes
- CC (Control Change)
- Pitchbend from the VL1 or KB input jacks
- While the loop is playing, you can freely navigate to other pages and edit the voice.
- ⚠️ Note: Playback may be interrupted during large SYSEX transmissions.
⏺️ Looper Controls
- RECORD: Start recording and begin playing
- STOP: End recording or playback
- PLAY: Loop the recorded sequence until stopped
- RECORD (during playback): Enter overdub mode to layer new notes or controller movements
- ERASE: Delete the current recording
- TEMPO IN %: Adjust playback speed from 50% to 200% in 10% increments
📟 TFT Display Feedback
- Shows:
- Current state
- Playback time (Minutes:Seconds)
- Recorded events
- Free memory
- When memory is full, recording automatically stops
- ⚠️ Loop content is not retained after powering off the controller
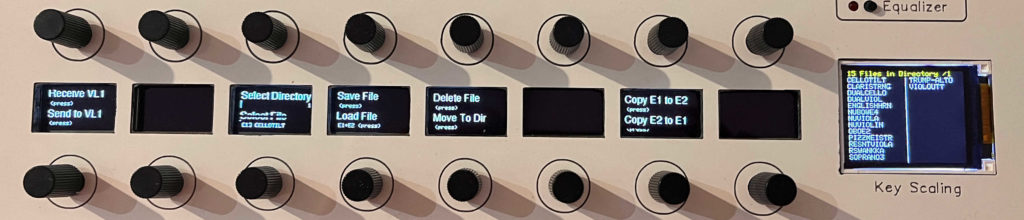
📁 File Management
The File page provides tools for managing patches and elements between the VL1 and the controller.
🔄 Patch Handling
- When a new voice is selected on the VL1, it is automatically sent to the controller
- You can also manually send/receive patches via SYSEX
💾 SD Card Storage
- Internally copy an element from one slot to the other
- Save and load patches to the internal SD card
- Choose from 20 directories for organizing your patches
- Load single elements (E1 or E2) to any destination
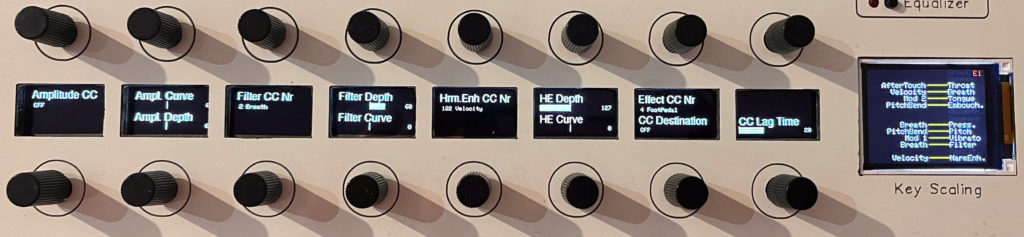
The Pages of The Control Block
The VL1 can control 16 destinations by any arbitrary MIDI-CC control number. These destinations are divided into 4 pages. The colour display gives an overview which controller is assigned to a destination. Unused destinations appear grey.
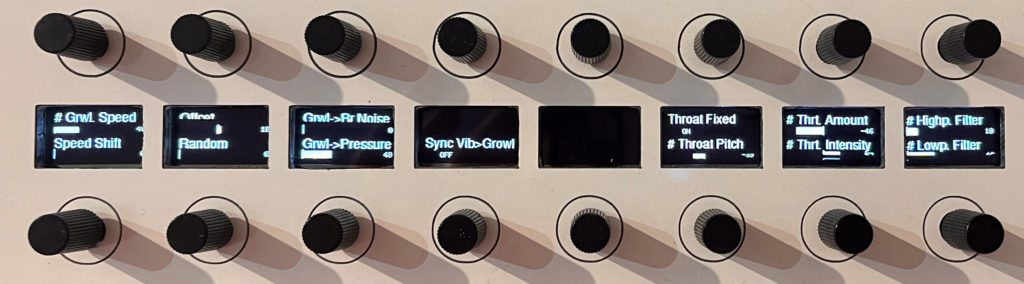
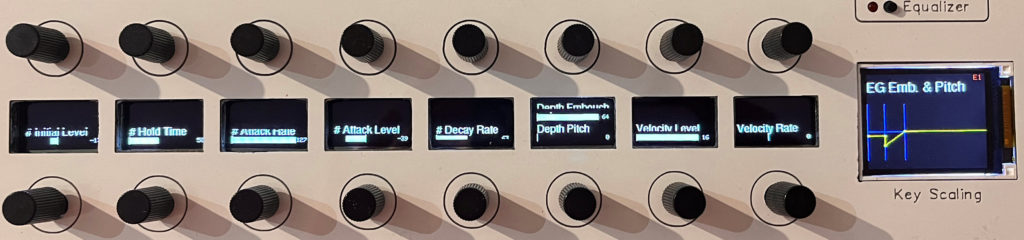
The Pages of The Driver Block
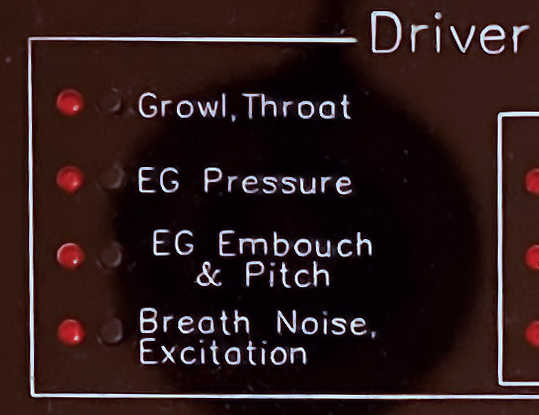
Growl, Throat
Pressure EG

Embouchure EG
Breath Noise, Excitation
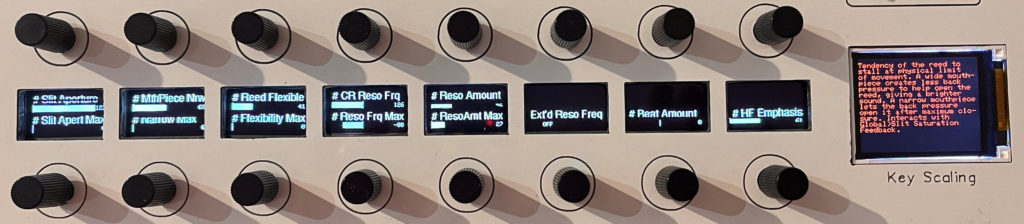
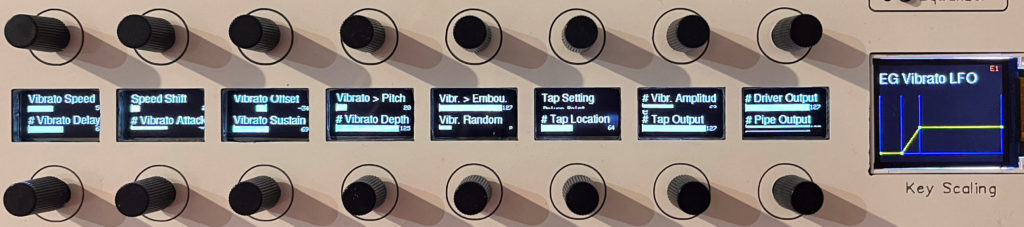
⚙️ The Pages of Physics Group
These pages explore the core mechanics of the internal model, offering deep control over the VL1’s behavior. Proceed with care—changes here can result in silence, chaotic output, or detuned instruments if misunderstood.
📘 Recommended Reading
To truly grasp the complexity and potential of these parameters, consult the highly regarded
“VL Programming Guide” by Manny Fernandez.
This guide provides essential insights into the model’s architecture and programming philosophy.
🖥️ On-Screen Help & Navigation
- Each parameter displays a brief help text on the color screen when selected.
- Despite the large number of parameters, they are logically organized, and with time, you’ll develop a clear overview.
- If the help texts become distracting, you can disable the help display via the Utility page.
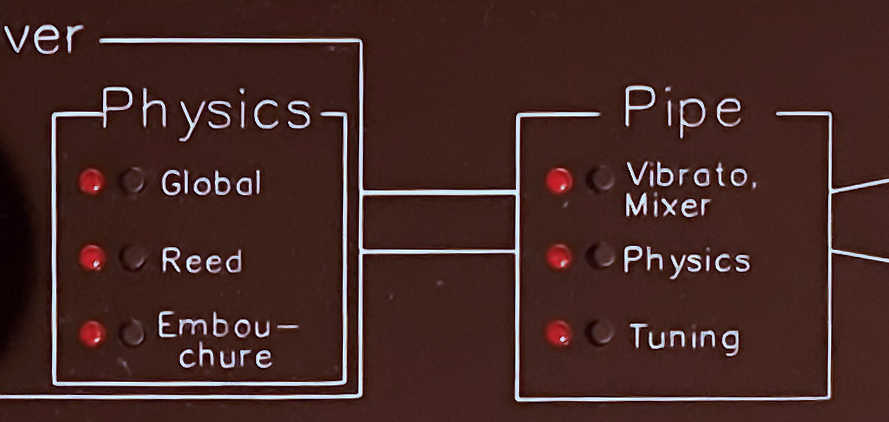
Global
Reed
Embouchure
Vibrato, Mixer
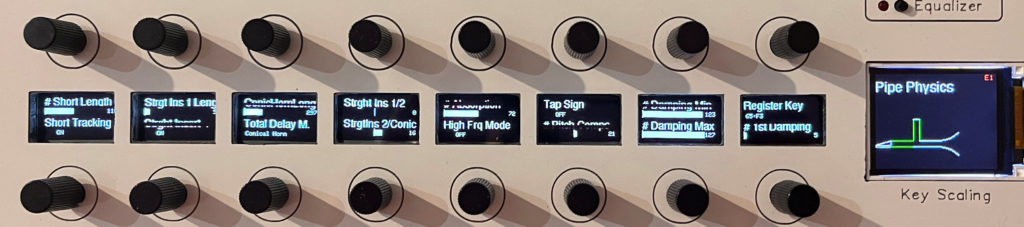
🔬 Pipe Physics
The Pipe Physics section introduces advanced modeling features available in VL1 Version 2, allowing for more nuanced control over pipe behavior.
🧩 Straight & Conical Inserts
- Toggle Straight Insert to ON to activate new parameters for both straight and conical inserts.
- The TFT display dynamically updates to reflect changes in the insert configuration.
🎨 Visual Feedback on the TFT Display
- Green segments: These lengths are tracked by the played key, adapting dynamically.
- White segments: These lengths are static, remaining unchanged regardless of the key played.
🎵 Tuning Your VL1 Instrument
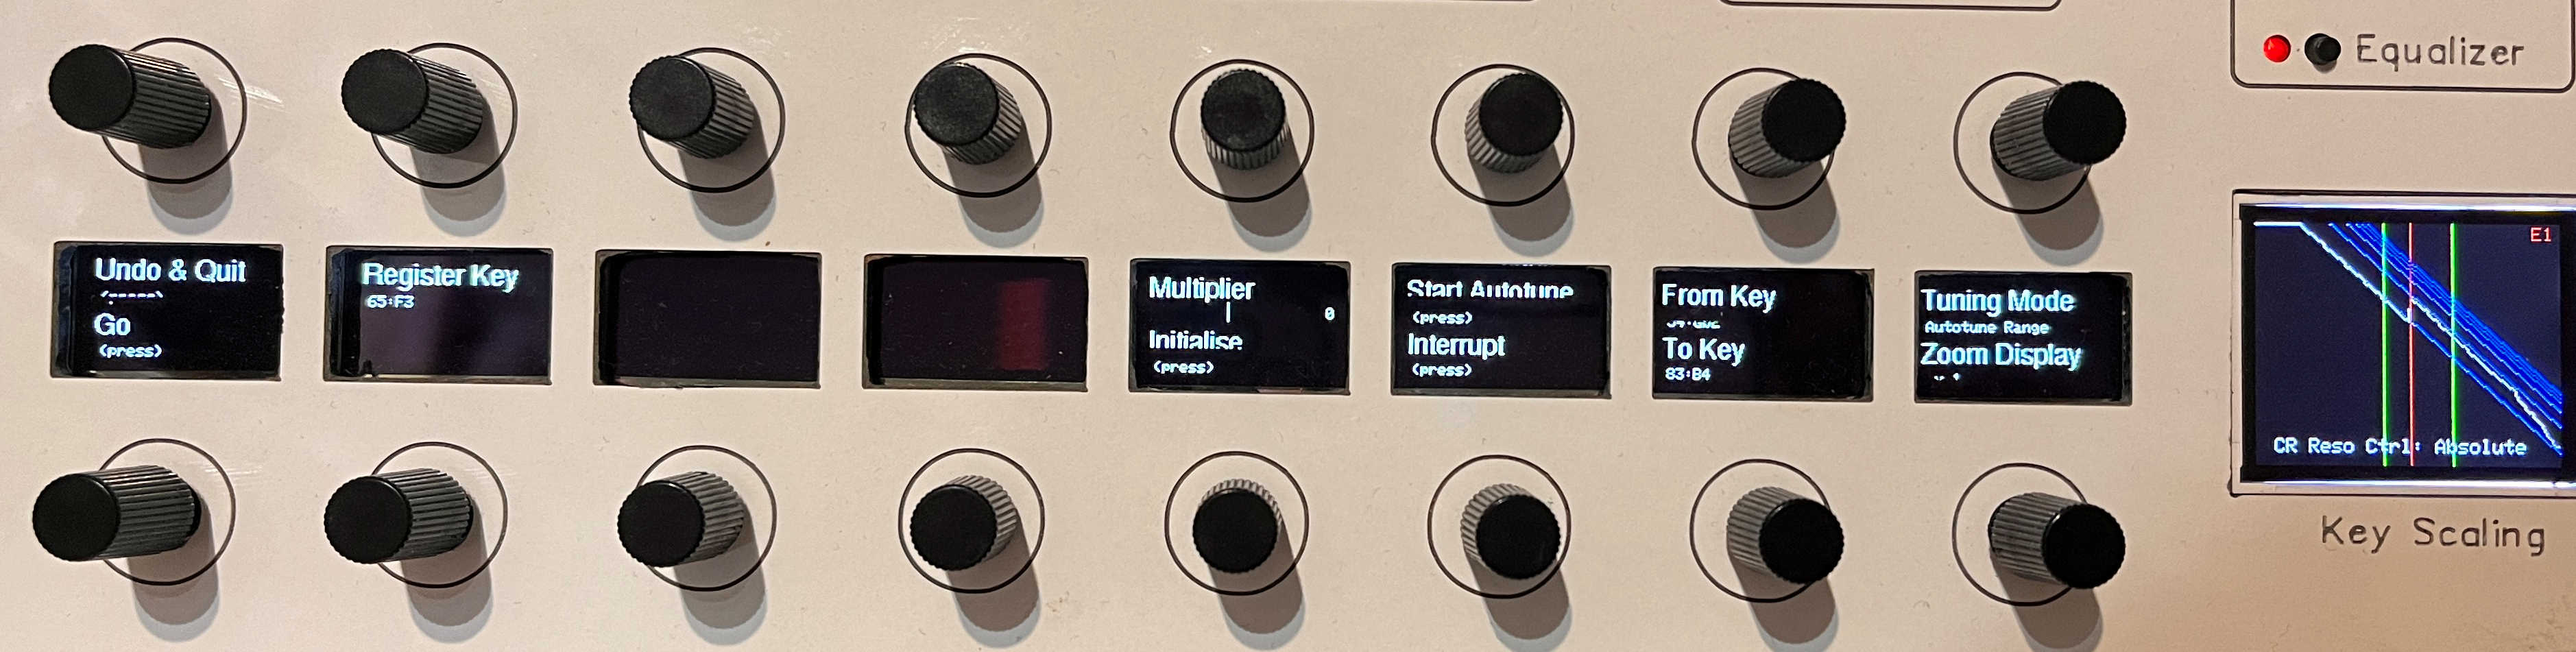
The Tuning page allows you to adjust the entire model with precision. Below are the recommended steps and modes to help you get started:
🎯 Getting Started: Tuning Mode “1 Key”
- Begin by selecting Tuning Mode: 1 Key for manual tuning.
- Use an external tuner to assist with accuracy.
- Choose a key using the ‘Select Key’ encoder or by playing a note on the keyboard.
- Fine-tune the selected key using ‘Tune Key’.
- The TFT display shows:
- X-axis: Key numbers
- Y-axis: Pipe length (white curve)
- Blue lines: Mode guides (lower lines = higher modes)
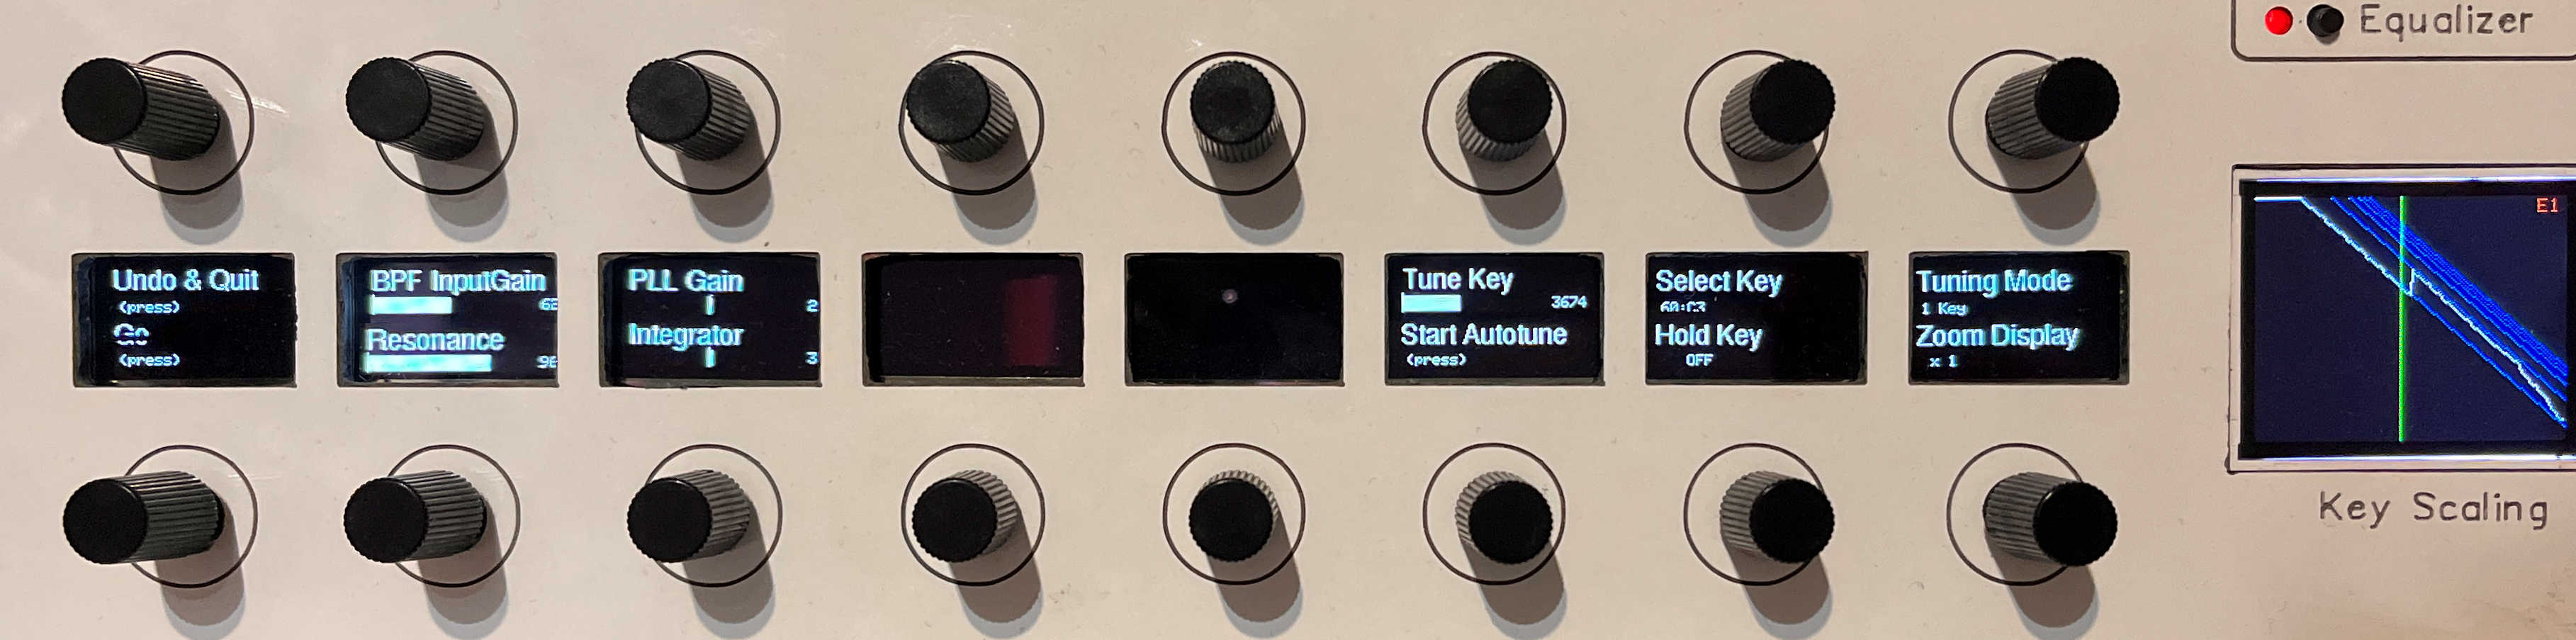
🤖 Autotune: Single Key
- Press “Start Autotune” to automatically tune one key.
- Default algorithm settings (e.g. BPF InputGain, Resonance, PLL Gain, Integrator) are preconfigured based on Manny’s recommendations—no changes needed.
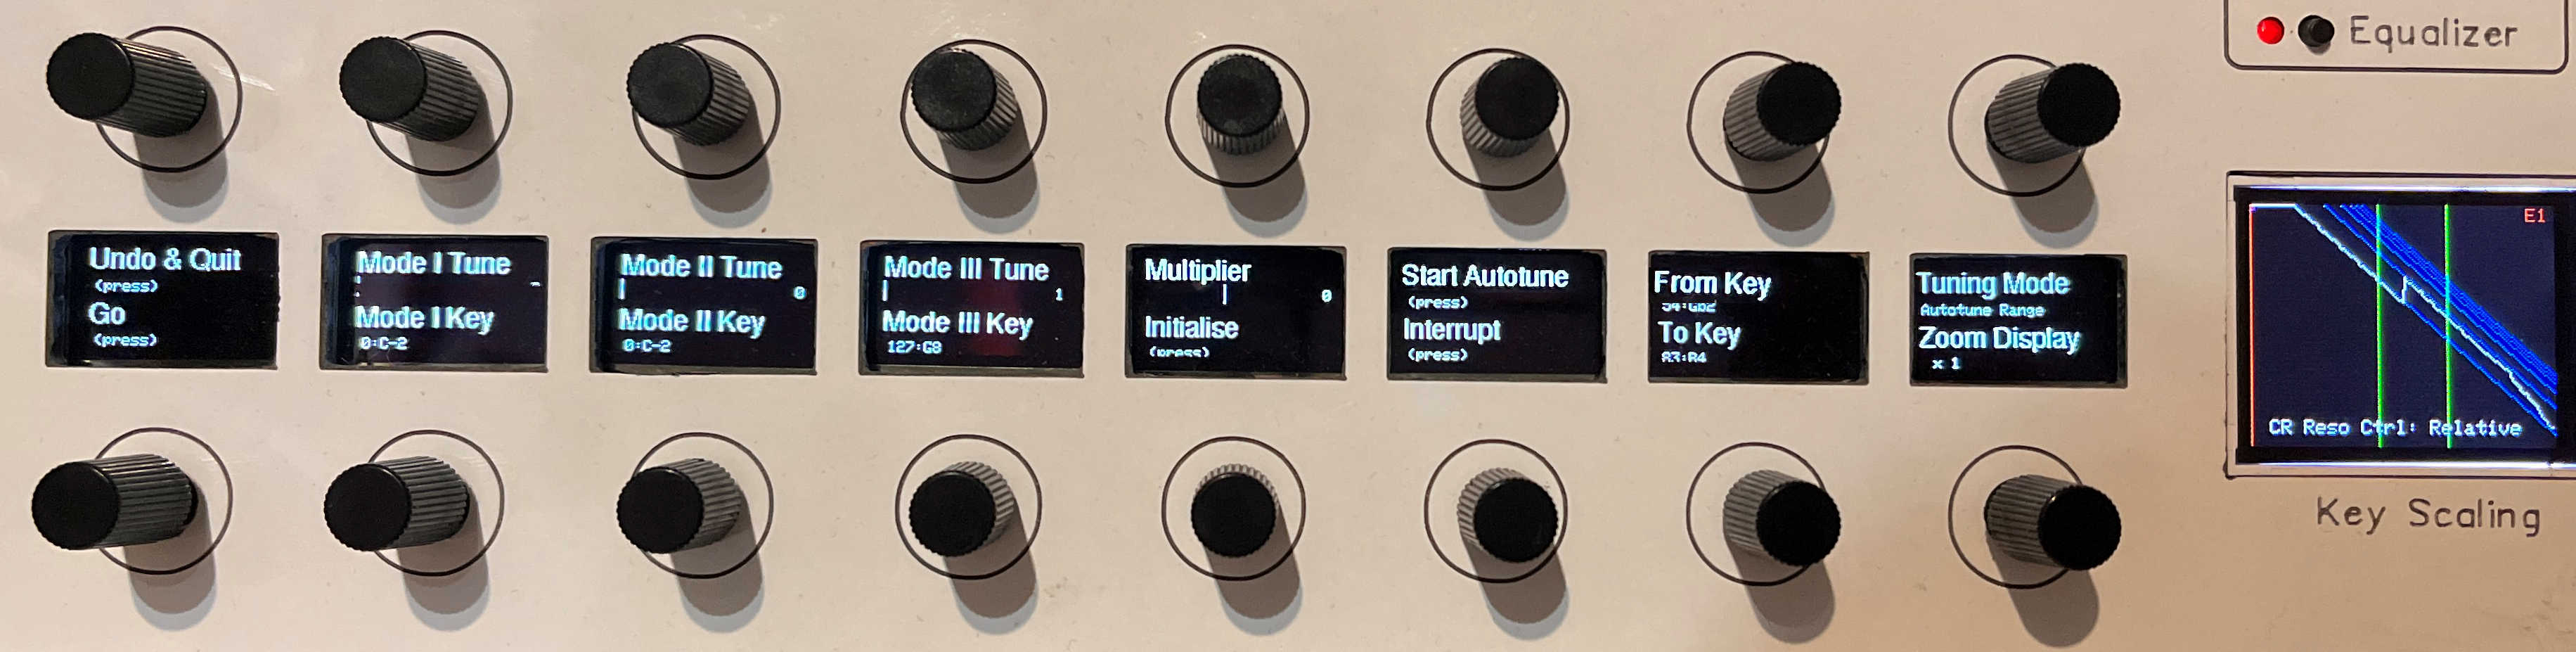
🧭 Autotune Range Mode
For more convenience and broader tuning:
- Select Tuning Mode: Autotune Range
- Press “Initialise” to generate an estimated tuning curve for your desired modes.
- You may experiment with the Multiplier setting.
- Define the range using “From Key” and “To Key”
- Press “Start Autotune” to fine-tune all keys within the selected range.
⚙️ The next steps depend on the CR Resonance Control setting found on the Reed page.
🔧 CR Resonance Control: Absolute Mode
- Only two modes are available, based on the Register Key.
- The Multiplier value determines the overtone for the second mode:
0= First octave63= Second octave
- Press “Initialise” to generate a starting tuning curve.
🔀 CR Resonance Control: Relative Mode
- This multimode setting allows for three breakpoints.
- Use the “Mode I–III Key” encoders to select keys where mode changes occur.
- Tune each to the desired mode line and press “Initialise”.
✅ Finalizing or Cancelling
- When tuning is complete, press “Go” to finalize and exit.
- To discard changes and revert to the previous state, press “Undo & Quit”.
- ⚠️ Important: Do not switch to other pages before confirming, as the VL1 remains in tuning mode and may not respond correctly.
The Pages of Modifier Group

EG Amp & Filter
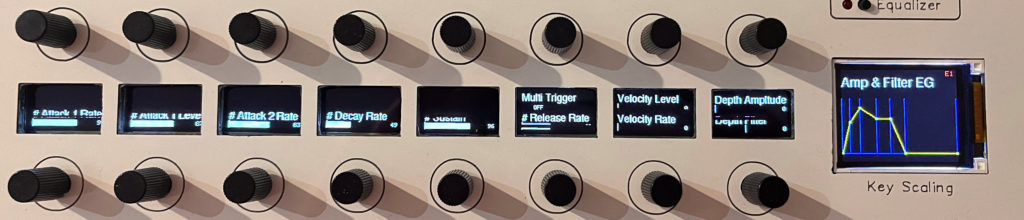
The LED lights dim, if the EG depth to filter is other than zero.
Filter
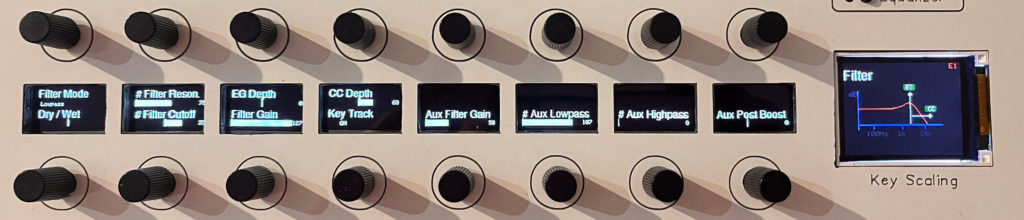
The LED lights dim, if the filter has some wet ratio.
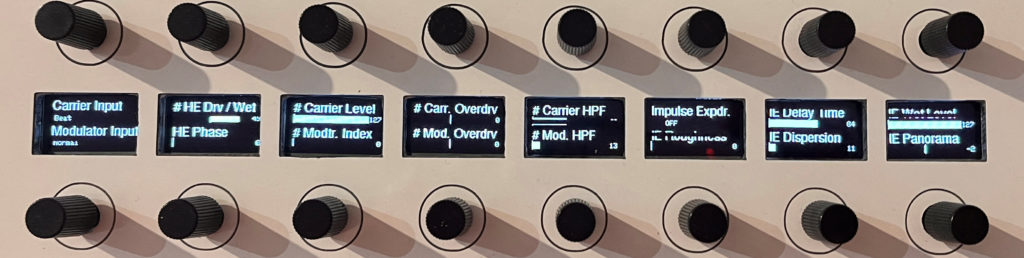
✨ Harmonic Enhancer & Impulse Expander
The Harmonic Enhancer (HE) is a powerful and efficient tool for shaping your sound. It’s the perfect starting point when you want to dramatically alter the sonic character—without changing the underlying model.
🎛️ Getting Started with the Harmonic Enhancer
- Begin by experimenting with:
- Carrier Input Type
- Modulator Input Type
- Overdrive Settings
- These adjustments can yield rich harmonic textures and dynamic tonal shifts.
💡 Impulse Expander Activation
- A dimmed LED on this page indicates that the Impulse Expander (IE) is currently active.
- The IE works in tandem with the HE to further enhance spatial and tonal depth.
Resonator
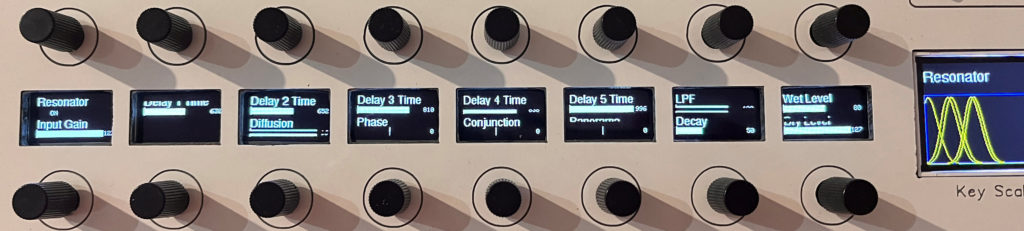
The LED lights dim, if the resonator has some wet ratio.
Equalizer
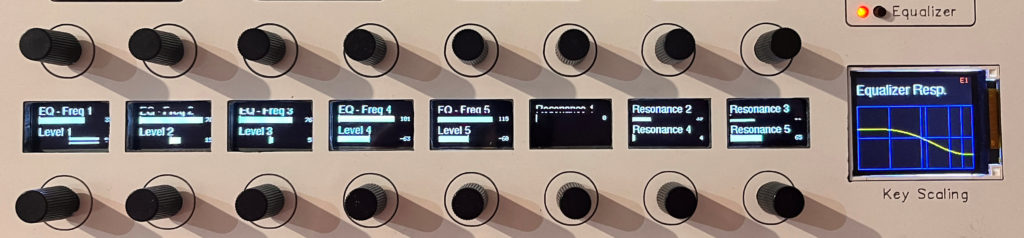
The LED lights dim, if any EQ level is other than 0dB.
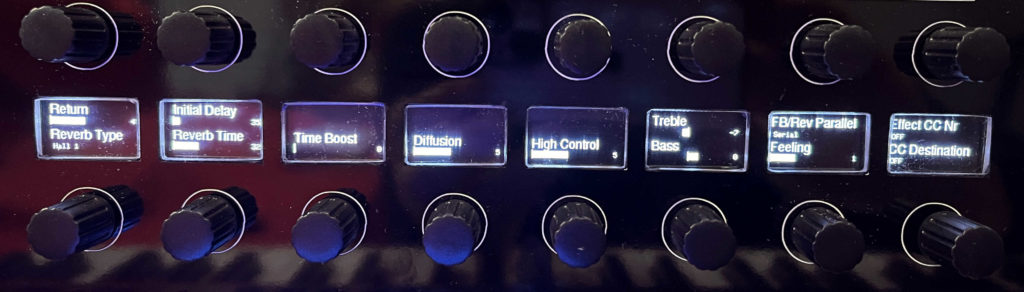
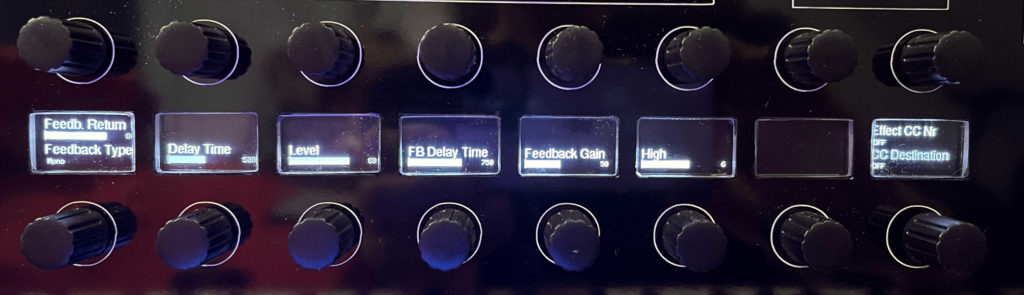
The Pages of Effect Group
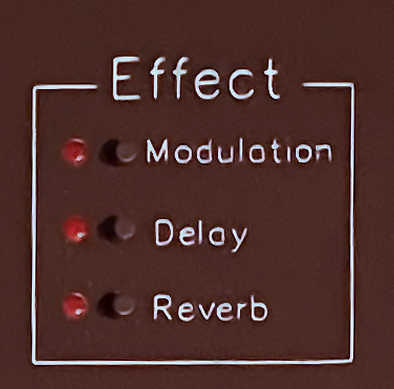
All effect parameters are fully accessible here. The corresponding effect LED glows when the effect is active.
Modulation
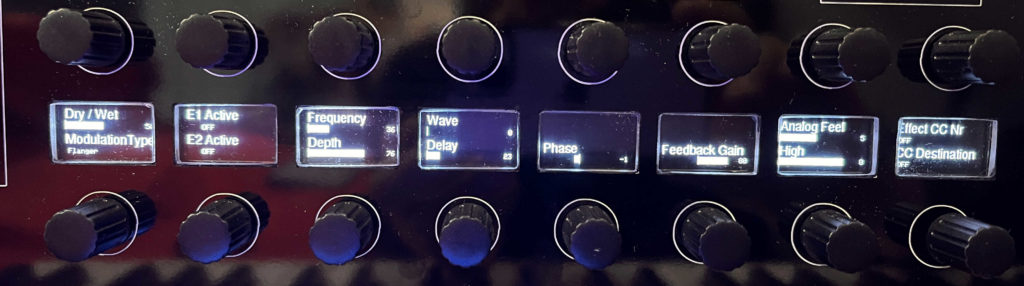
Delay
Reverb